Garbage Disposals
Garbage Disposal Humming or Not Turning On? Reset It First
Garbage disposal humming, jammed or not turning on? How to reset it and free a jam safely, what each sound means, what a leak from the bottom means, and costs.
By Atlanta Appliance Techs · Published · Updated · 9 min read
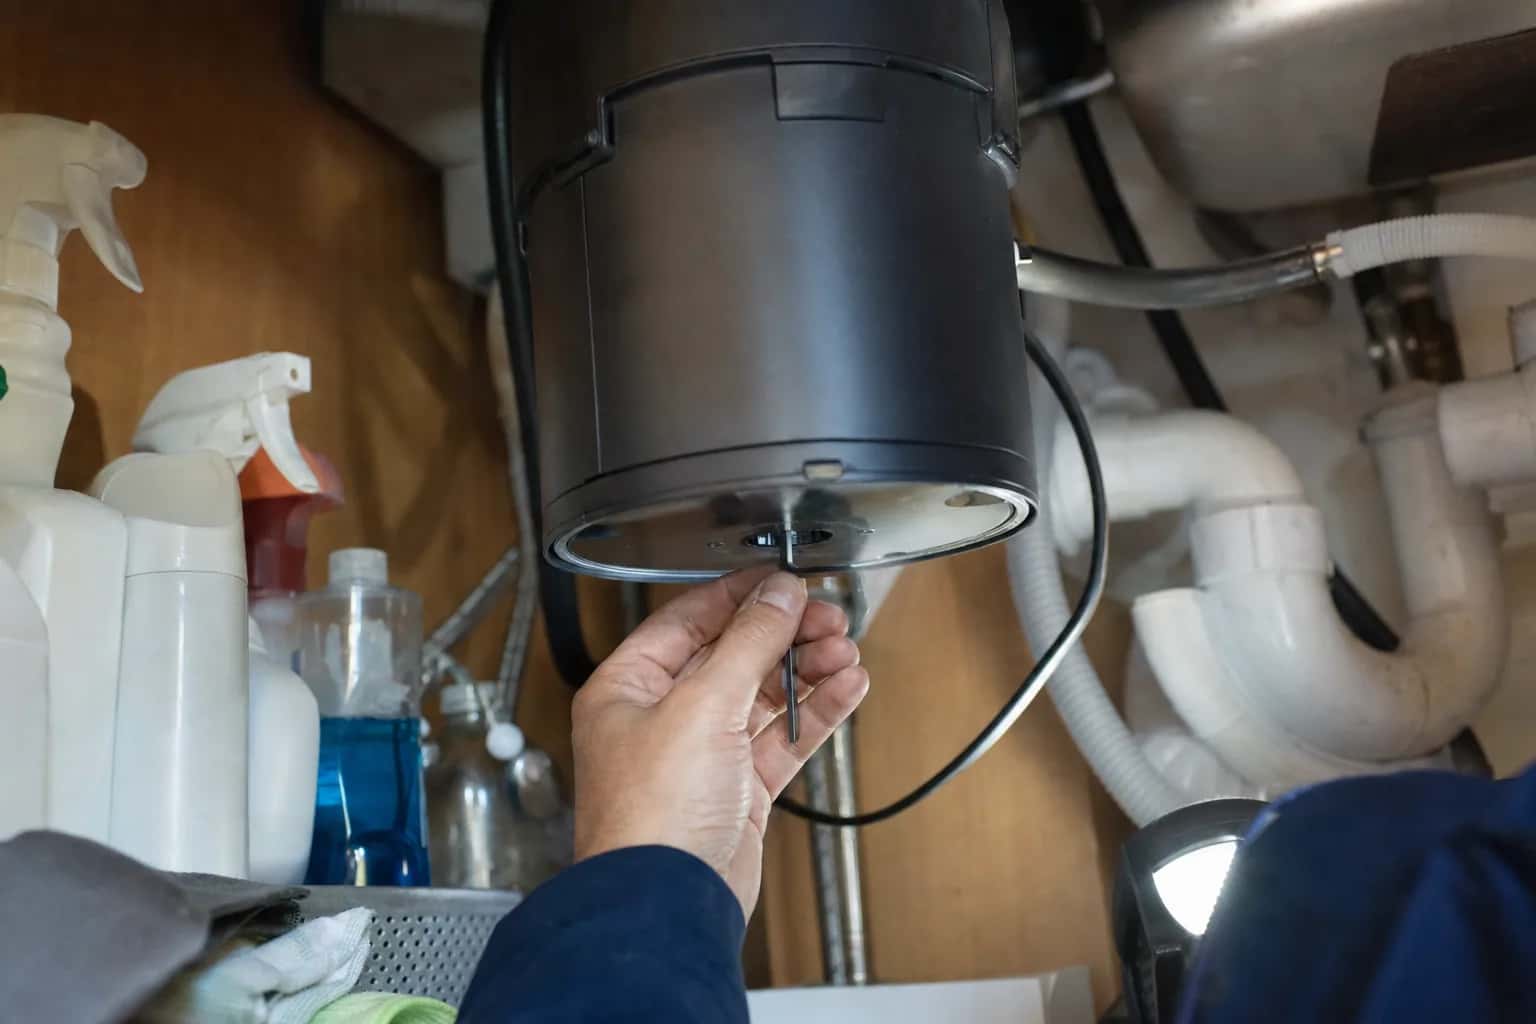
A garbage disposal humming but not turning is usually jammed: the motor is getting power, but a fruit pit, a bone chip or a stray bottle cap has locked the grinding plate. One that makes no sound at all has usually tripped its own reset button or lost power at the switch, the outlet or the breaker. Both are often fixed in ten minutes with no parts, as long as you do it safely.
Quick answer
| Symptom | Likely cause | Safe to check yourself? | Typical fix |
|---|---|---|---|
| Hums but does not grind | Jammed grinding plate | Yes, with the power off and the wrench | Free the plate from below, remove the object |
| No sound at all | Tripped reset button, breaker, GFCI or switch | Yes | Press the red reset button, then check the power |
| Runs, then shuts itself off | Overload protector tripping | Yes | Clear the jam, let it cool, reset |
| Rattling or metallic clatter | Something hard in the grind chamber | Yes, with a flashlight and tongs | Remove the object |
| Water at the top, by the sink | Mounting assembly loose or poorly sealed | Partly: check the locking ring and screws | Tighten or reseal the mount |
| Water at the side | Dishwasher inlet or drain connection | Yes: check clamps and the gasket | Clamp, adapter, gasket or elbow |
| Water from the bottom of the unit | Internal leak | Only to confirm where it starts | Usually a new disposal |
Safety first
- Turn it off twice. Switch the disposal off at the wall switch, then unplug it under the sink or switch off its breaker. A wall switch alone is too easy for someone else to flip.
- Never put your hand in the disposal, even with the power off. InSinkErator's instructions say not to, at any time. Use tongs or pliers and a flashlight instead.
- Do not leave it humming. A stalled motor heats up fast, so switch it off as soon as you hear the hum.
- Skip the chemical drain cleaner. InSinkErator's care and use manual lists caustic drain cleaners among the things never to put in a disposal.
What the sound tells you
| Sound | Cause | Safe fix | Call when |
|---|---|---|---|
| Steady hum, no grinding | The motor has power but the plate is jammed | Power off, turn the wrench in the hole on the bottom, remove the object with tongs | The wrench will not turn, or it jams again with nothing inside |
| Silence | The reset button has tripped, or no power is reaching the unit | Press the red reset button; reset the breaker; do the lamp test below | A lamp works on the switch but the disposal still does not; InSinkErator says it then needs service |
| Clicking, rattling or a metallic "machine gun" noise | A foreign object in the grind chamber | Power off; look around the outer edge of the shredding disk with a flashlight; remove anything with tongs or pliers | Nothing is visible and the noise continues |
| Loud vibration | Loose plumbing connections, or the lower mounting ring has come unlocked | Tighten the connections; relock the ring with the wrench, turning right until it clicks | The ring will not lock, or water appears at the sink |
| Runs briefly, then stops | The overload protector shuts it off, often because of a jam | Clear the jam, wait for it to cool, press reset | It trips again right away with nothing jammed |
| Harsh grinding with nothing inside | Possible internal damage | None: switch it off | Always |
The clicking, rattling and vibration causes come from InSinkErator's page on unusual disposal noises.
Checks you can do yourself
- Cut the power as described above. If the sink is full of water, wait for it to drain or bail it out.
- Free the jam from below. On most InSinkErator disposals there is a hole dead center on the bottom of the unit, facing the floor. Insert the small crank-shaped wrench that came with the disposal, or a standard 1/4-inch Allen wrench, and work it back and forth in both directions until it turns freely in complete circles. InSinkErator says it is OK to use some force; the wrench is designed to bend before the disposal is damaged.
- Remove what caused it. Shine a flashlight into the drain opening and pull out anything you can see with tongs or pliers.
- Press the reset button. It is a small red button on the bottom of the unit. When it has tripped, it sits about a quarter of an inch (5 mm) lower than normal. Press it gently. If it does not stay up, InSinkErator says to wait ten minutes and try again.
- Restore power and test. Plug it back in or switch the breaker on, run cold water, then turn the disposal on.
- Still silent? Work through the power checks further down.
Garbage disposal humming but not turning
The hum is the motor trying to start against a locked grinding plate. Jams are usually hard objects, such as pits, bone fragments, shells, silverware or a bottle cap, or a wad of stringy food. InSinkErator says to pay special attention to the outer edge of the shredding disk, where you see the little teeth. Turning the plate from below with the wrench is safer and more effective than prodding from above.
Some disposals have no wrench hole. For its Builder Series, Amana and ES units, InSinkErator's method is to turn off the disposal and the water, rotate the turntable in either direction with a wooden spoon to dislodge the object, remove the spoon, and lift the object out with tongs. For any other brand, your owner's manual shows the right method.
If the wrench will not budge, if the plate frees up but jams again with nothing in it, or if the disposal grinds harshly with nothing inside, something inside is probably damaged, and it is time to call.
Garbage disposal not turning on
If there is no hum at all, the disposal is not getting power. Check in this order:
- The reset button. The overload protector shuts the disposal off if it jams, runs for a very long time or has another problem. Press it as described above. Disposals with InSinkErator's EZ Connect have an automatic overload switch instead: turn off the wall switch, or unplug a push-button model, and wait up to 20 minutes before trying again.
- The breaker. Even if it looks fine, InSinkErator says to switch the breaker off and then on to be certain, or replace the fuse.
- The GFCI. Many kitchen and under-sink outlets are protected by a GFCI, the outlet with Test and Reset buttons, and the one that tripped may be up on the counter rather than under the sink. Press Reset.
- The wall switch. On a plug-in disposal, InSinkErator's test is simple: unplug the disposal, plug a lamp or night light into the same outlet and flip the switch on and off several times. If the lamp turns on and off with the switch, the disposal needs service. If it does not, the outlet or switch needs an electrician.
- A hard-wired disposal. After the breaker check, InSinkErator says the problem may be in the disposal or in the electrical system, so this one is for a technician or an electrician.
Garbage disposal reset button keeps tripping
One trip after a jam is normal. A reset button that trips every few days, or right after you press it with nothing jammed, means the motor is overheating for a reason the reset does not fix. Stop resetting it and have the disposal checked.
Garbage disposal leaking from the bottom
First make sure the water is really coming from the bottom. InSinkErator recommends ruling out a leak higher up that runs down the outside of the unit: empty the cabinet, tape a sheet of newspaper flat on the cabinet floor, fill the sink with the stopper in and leave it a while, then drain it, and finally run the water and the disposal while you watch for drips again.
If the leak really is from the bottom, through the wall of the body or at the motor joint, InSinkErator offers no do-it-yourself fix and asks owners to contact the company. A leak from inside the unit cannot be resealed from the outside, and it puts water close to the motor, so switch the disposal off and leave it off. If it is still under its manufacturer's warranty, contact the manufacturer first. Out of warranty, the practical fix is usually a new disposal, and our garbage disposal repair and replacement visits include a flat installed price for the new unit.
Leaking from the sink flange or a side connection
These leaks are usually repairable:
- At the top, by the sink flange. InSinkErator's checks: make sure the locking ring is rotated fully to the right, and that the three mounting screws are each tight. On a new installation, excess plumber's putty under the flange can also cause a leak; the fix is to remove the disposal, clean off the extra putty and remount it. Because that means dropping the disposal, it is a job for a technician or plumber.
- On the side, at the dishwasher inlet. InSinkErator lists a knockout plug that was never removed, loose hose clamps, a damaged or poorly installed hose adapter and a loose elbow or trap joint. If the dishwasher also backs up and the disposal is new, the knockout plug is the first suspect; our dishwasher not draining checklist covers it.
- On the side, at the drain pipe. InSinkErator says to check that the discharge nut or bolts are tight, look for debris, cracks or rips in the gasket, and check the discharge elbow for cracks.
What not to put down it
Follow the manufacturer here. InSinkErator's care and use manual says:
- Never fats, oils or grease. Put grease in a jar or can and throw it in the trash.
- No clam or oyster shells, caustic drain cleaners, glass, china, plastic or metal, such as bottle caps, tin cans or utensils, and no hot grease or other hot liquids. Paints, solvents, household chemicals and plastic wrap stay out too.
- Feed peels gradually. Do not fill the disposal with a lot of vegetable peels at once; turn on the water and the disposal first, then feed the peels in a little at a time. Avoid large amounts of fibrous material such as corn husks or artichokes.
- Use cold water, not hot. Turn on the cold water first, then the disposal, and keep the cold water running for several seconds after grinding stops to flush the drain line.
Know your model. InSinkErator's grinding guide lists potato peels as fine for all of its series, but lists banana peels, celery, corn cobs and chicken bones only for its Advanced Series. Your manual says what yours can handle.
What usually fails
- A jam. No parts needed, just the wrench and a few minutes.
- The motor. Repeated resets with nothing jammed, or a motor that hums and will not turn even after the plate turns freely.
- An internal seal. A leak from the bottom or the body, which usually means replacement.
- The mounting assembly. A leak at the sink that can be resealed.
- The dishwasher hose, clamp or gasket. A leak at the side that is usually a simple fix.
- The switch, outlet or wiring. No power reaching the disposal.
What it costs in Atlanta
The diagnostic visit is $80, and it is waived when you approve the repair. Disposal repairs start at $180 plus parts. When a disposal needs replacing, we quote a flat installed price; a new unit installed typically runs $250 to $450. Every job starts with a written flat-rate estimate and carries our 60-day parts-and-labor warranty. See typical total costs.
Repair or replace?
Repair jams, resets, flange leaks and hose leaks. Replace a disposal that leaks from the bottom, has a burned-out motor or grinds with nothing inside. As a rough guide to age, InterNACHI's life-expectancy chart estimates about 12 years for a food waste disposer. Our repair-or-replace guide covers the general rule for every appliance.
Schedule a visit or read about our garbage disposal repair service. Prefer to talk? Call (470) 778-4087.
Sources
- InSinkErator: Fixing a jammed garbage disposal
- InSinkErator: Garbage disposal won't turn on or off
- InSinkErator: Garbage disposal is making an unusual noise
- InSinkErator: Garbage disposal leaking
- InSinkErator: What can I grind in a garbage disposer?
- InSinkErator: Power 75 installation, care and use manual (PDF)
How we write and check these guides: editorial policy. Spot an error? Email hello@atlantaappliancetechs.com.
About Atlanta Appliance Techs
Atlanta Appliance Techs is a locally owned appliance repair company serving Metro Atlanta, including garbage disposal repair in Atlanta. $80 diagnostic waived with the repair, 60-day parts-and-labor warranty, and gas, electric and induction appliances. More about us.